Welcome to my blog, hope you enjoy reading
RSS

Friday, September 10, 2010

Keychain - 3D Modelling

Now,
It is my second year, first semester....

We were been assigned to do a keychain with the picture given by lecture.
Show at below: The software to create the model willl be as below..
Software: 3ds Max 2010
This is our first modelling assignment,

Which allow us learn how to model the shape of the product itself...
Its my first time to interact with 3D software..

Duration of time for me to complete this assignmeent is 2 weeks.
KeKez...

Its kinda long for me, or a designer..
Because.. this is a very basic and simple modelling assignment..

Through this assignment i learnt the techinique of how to model a 3D model in better way and fast.

Learn from error..
Finally....my final work is:

Basically, lecturer just request for a basic model,

without mapping and render setting.

But i perfer my model with some nice lighting, material look ...

So i added material, and render setting(mental ray) on it.

:)

Friends,

Hope you all like the very first 3D design master piece. :)

Thursday, January 21, 2010

Assignment 2 - Greeting Card

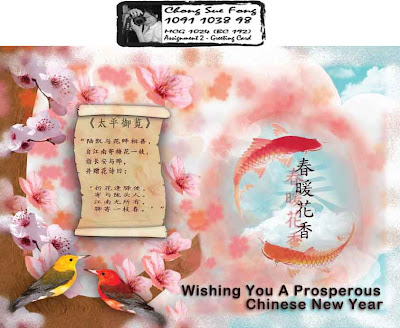
Greeting Card - Spring Festival

Season: Spring Festival

Theme: Blossom Flower


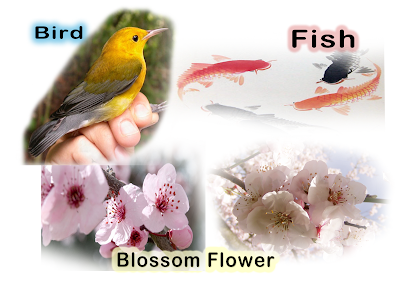
The Greeting Card is created by four(4) original image.:

1. Fish
2. Bird
3. Blossom Flower

Description:
Spring Festival (Chinese New Year) is the most important traditional Chinese festival......
Chinese believe fish is symbolizing surpluses
& Peach blossom symbolise luck of the year
At the same time, Chinese prefer things come with pairs.
It represent companion.

The Poem on the Greeting Card is about the feeling of missing and thinking of the family....
In additional, the peach blossom is about the beauty of spring season and
the harmony in the season......

Coming Chinese New Year will be on 14th of Feb 2010..


Reason of choosing Chinese New Year:


Spring Season....
Its a season that gather family, relative together.

The festival traditionally begins on the first day of the first month
in the Chinese calender and ends on the 15th.

In the Chinese New Year period...
Children will be very happy of it,
Cause the adult will giving o0ut the red packet as a wish and bless of the year.

The adult will have the opportunity to meet the siblings
cause in the Chinese New Year eve there is a reunion dinner in every family.
They will share their happiness by jokes and story.

In this season, every family member try their best to keep the tradition..
because, in Chinese New Year there is some rule to restrain....
The rules that keep the wealth, happiness of the year..
Its a good tradition which involve every member of family....

Work it out to be a good year ....
It will keep the family always be close :)

Idea:
The whole design concept is base on simple and relax(but not the process :D ).
Due to Spring Festival is a very cheerful and happy season.

And based on a glance that can sense the new year is near to us :)
(perhaps i manage to bring the feeling out) .


Yet,
The blossom flower symbolize harmony
and the beauty scene that had while in spring season.
The flower will bloom in the spring season,
The birds will singing song and enjoy the spring season.


Tools and Effect Used:

Tools:

  1. Brush Tools
  2. Pen Tools
  3. Marquees Tools
  4. Move Tools
  5. Magic Wand
  6. Eyedropper Tool
  7. Crop Tool
  8. Clone Stamp Tool
  9. Eraser Tool
  10. Dodge Tool
  11. Burn Tool
  12. Text Tool

Effect / Adjustment:
  1. Opacity
  2. Fill
  3. Drop Shadow
  4. Inner Shadow
  5. Outer Glow
  6. Inner Glow
  7. Bevel and Emboss
  8. Rasterize image
  9. Gaussian Blur
  10. Lens Blur
  11. Hue/ Saturation
  12. Texturize
  13. Mezzotint
  14. Diffuse Glow
  15. Glass
  16. Blur


Producing Step:
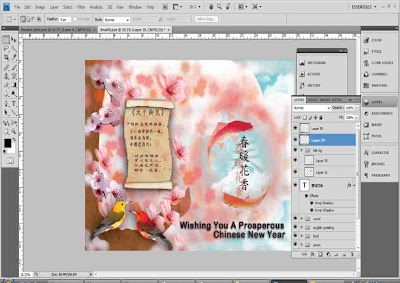
1. Using brush and shape tool to create the background.
The pink color background use bevel and emboss effect + Gradient effect.
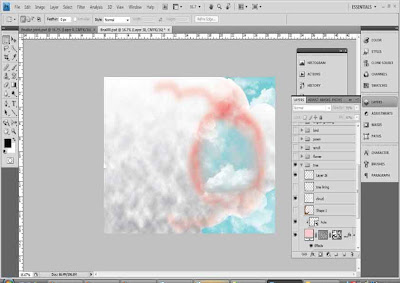
The sky's cloud texture use brush and clipping mask.2.The tree is using pen tools to create the shapes.
The Texture used is Texturize and Mezzotint.
Used Mesh Tools to adjust the shape.
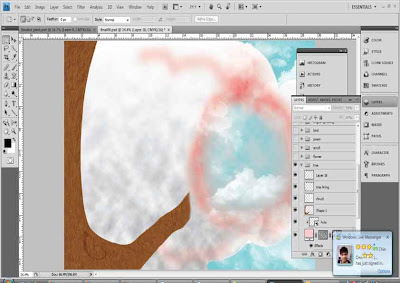
3.Use brush to draw the fade flower.
Crop the original image and paste on the image.
Use Clone Stamp Tools to multiply the flower.
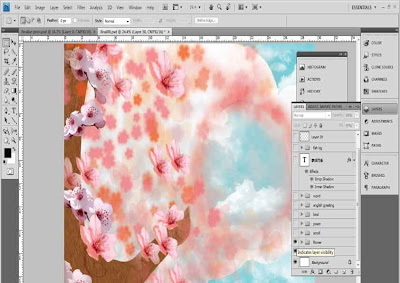
4. Using Pen Tools to trace a shape of scroll.
Then mesh it.

The effect of scroll tools is drop shadow, inner glow, bevel and emboss.
Then add some paper texture on the scroll with clipping mask.
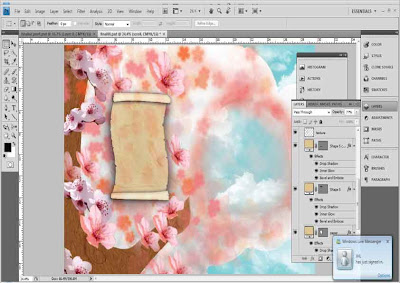
5.Add the poem on the scroll.
Source of the poem is cy.5156edu.com.
Title effect is Inner shadow, outer glow and bevel and emboss.
The content using effect of inner shadow and outer glow.
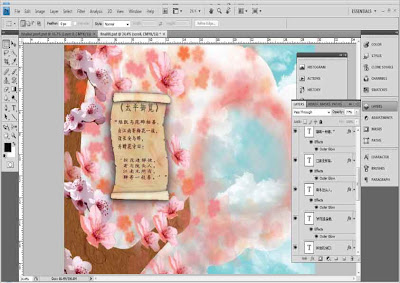
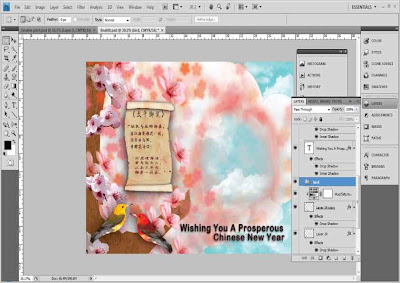
6.
Bird: Crop the original image.
Adjust the bird color in Hue/Saturation.
The both bird use the effect of drop shadow.

English Text: the text is using the effect of drop shadow and inner shadow.
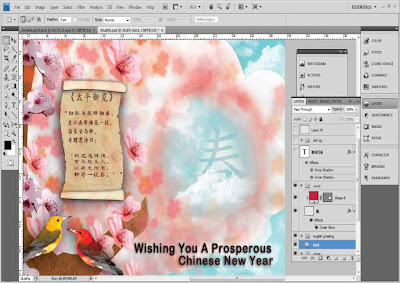
7. Create the word of 春 in the hole.
Then use layer mask on the words.
The effect of the words is outer glow.
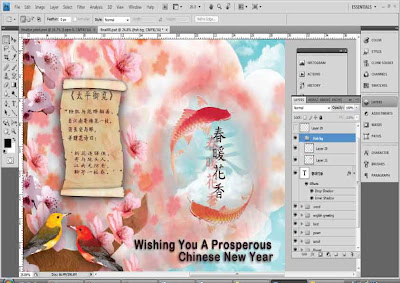
8.
Text of " 春暖花香": using effect of drop shadow and inner shadow.
Fish: Crop from the original image.
9.Last part and layer put on the frame.
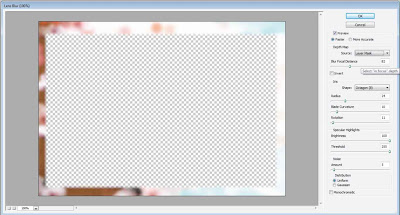
And adjust the color by burn or dodge tool.Step to create the frame is use blur effect to adjust the blurness.
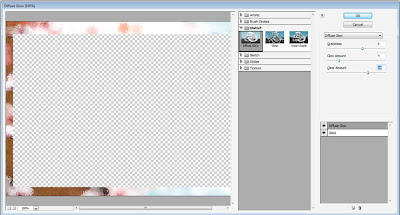
Then use filter effect, diffute grow and glass filter to adjust the texture.
~The End~

Idea of Greeting Card


This is my greeting card draft.


Season: Chinese New Year
Theme: Blossom Flower


Chinese New Year is in the spring.
Spring should be picture with blossom and crowded street.

Blossom will grow flourishing.
So, it representing the wealth and happiness of year will grow as how blossom grow.

Chinese New Year is a happy and prosperous festival.
So, while designing tis card.
Mainly focus on the feeling that shown from the card.

Photo Filtering - Glowing effect

This is the Adjustment of mine.
Creating a effect of glowing flower.
It only require four simple step.

First:
Create a lightening effect.
Second:
Apply an Gradient and Cloud effect on the image.
Third:
Adjust the adjustment of brightness/contrast, color balance and exposure.


Forth:
Add some simple brush on top the flower to create some spark. :)
~The End~

Keep smile :)

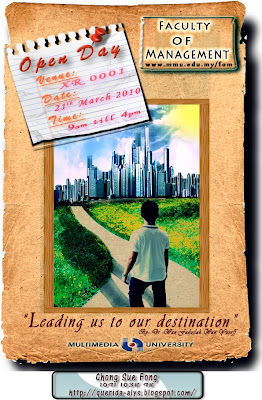
Poster - Faculty of Management

Poster - Faculty of Management
Ideas of this poster:
I created this poster according to the vision of Faculty of Management(FOM).

Vision of FOM:
“Leadership through innovative teaching, learning, research and publication” – is the vision statement of our faculty, and this vision leads us to set our destination.
By Dr. Wan Fadzilah Wan Yusoff, Dean of Faculty of Management.

Story in the poster:
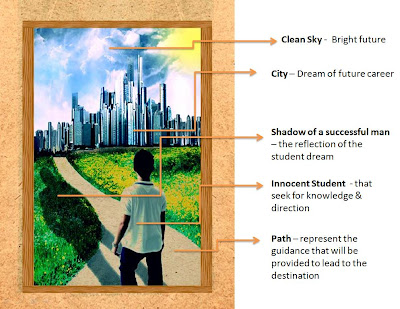
There's a short story in this photo.

There's a student named Mike. Mike just ended his secondary school, he is wondering whats the right path that could lead him to be someone on the top of the corporate and world. He wish he could pursuit the knowledge in various fields of management.

One day, he come across Multimedia University(MMU). After he go through the introduction and visit the campus of MMU. After that, Mike believes that MMU could be the path to lead and guide him to the place he belong.


Explanation of the the image in the poster:

Steps to create this poster:

Background Old paper:

1. Grab the Photo on web.

2. Retouching the photo with Spot Healing Tools, Healing tools & Patch Tools, to Adjust the details of photo.

3. Eraser tools to Delete the white background of image.

4. Mesh the paper to made it naturally look.

Background old paper(shadow):

1. Using the Paint Bucket Tools to paint the image black & Guassian Blur Tools to made the shadow.

Top Right-hand Side (FOM):

1. Added effects on the small box,

a.) Drop Shadow, b.) Inner Shadow, c.) outer Glow, d.) inner glow, e.)bevel & emboss.

2. Text is using the effect of outer glow only.

Top Left-hand side (Notes):

1. Using Rectangular Tools, Elliptical Marquees Tools, Single Row Marquees Tools, Single Column Marquees Tools to create the notes.

2. Using brush to add the wrinkles on the notes.

3. Then use clipping mask to remove unwanted part.

4. Using Layer Mask to reveal the part I want.

Shadow of the notes:

1. Using Invert Effect on the original image & using Guassian Blur tools to made shadow.

Text in the notes:

1. Title of Open Day using effect of Drop shadow and Bevel And Emboss.

2. Others Text using effect of Drop shadow.

Logo of MMU:

1. Using the effect of Inner Shadow, Outer Glow, Bevel and emboss.

Photo:

A.) Human on the path:

1. Using Liquify's Bloat Tools to made the model slightly fat & adjust the leg.

2. Mesh the Image to look natural in angle.

B.) Shadow on the Grass:

1. Adjustment of black and white of the image.

2. Posterize the Image

3. Using Magic Wand tools select the image.

4. Then, Color the image black with brush.

5. Rotate and Mesh the image photo.

6. Crop the shape of the image with eraser. to look more real.

C.) Grass:

1. Magic Wand to select and edit the tools with cooperating tools of Patch Tools, Healing Tools.

2. Adjust the grass with Dodge Tools & Burn Tools to adjust the contrast on the grass.

3. Edit the Shape of the image with Eraser Tools.

D.) City:

1. Crop the image.

2. Eraser tools to Remove unwanted part.

3. Using Brush Tools to Edit the sky part, make it more bright.

**The Overall photo in the poster:

1. Adjust the color with

a. Brightness/Contrast

b. Levels

c. Curves

d. Exposure

e. Hue/Saturation

f. Color Balance

g. Channel Mixer

h. Selective Color

2. Create a Frame surrounding the image.

3. Add half below part of the image with a light background image on top, to look natural & show contrast on the city, Put specific highlight on the city, and represent the bright future.


Tips: Group the Layer, to made it clear & easy to side-track and edit process.

Hope you like it. >.<


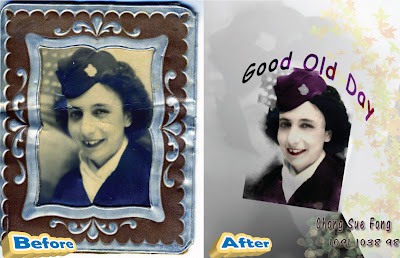
Old Photo Retouching

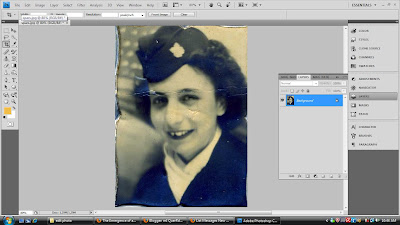
I will go through with the way & method i retouch the grumble photo and color of the photo.

Step 1: I crop the image first & zoom in.


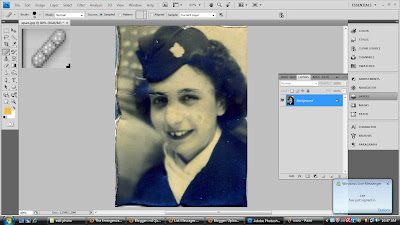
Step 2: Using Healing Tools to heal the grumble place or dark spot.
(The Healing Tools is shown in the top left side of the image.
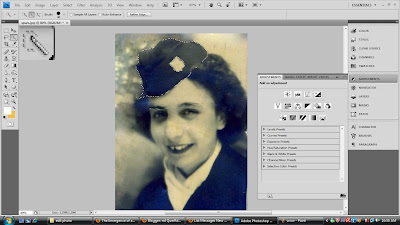
Step 3: Using the Quick Selection tools to select the part u wan to adjust the color.
&
Adjust the color with Adjustment Color.
(try Hue/Saturation, Color Balance & Channel Mixer)
(ps: different part might have slight different mixture. so adjust part by part.)

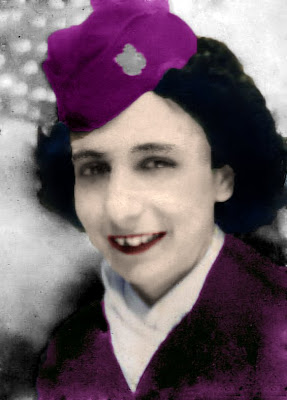
Finalize with below image. :)
It takes few hours to complete it.
Guys, be patient. >.<
~Enjoy the process...~ by Allyssa


How to edit the blog theme?

Last night, my friend ask me to teach her the way of edit the blogspot layout.

Well, sorry for cant help up immediately, due to i have to out for dinner.

Perhaps, the step i guide will help you up. >.<

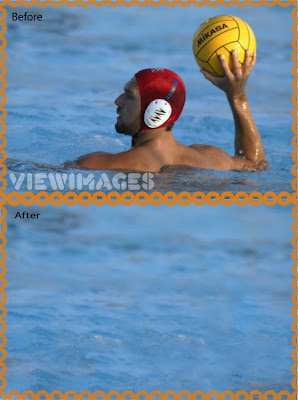
Photo Retouching - Water

This is a simple photo retouching by removing the swimmer and the words.

Software : Adobe Photoshop CS4

Tools: Magic Wand Tools, Patch Tools, Clone Stamp Tools.

Steps:
(shown in Figure A)
Figure A

  1. Use the Magic Wand Tools to select the part of you want to remove.
  2. Then, click the Patch Tools & move the part you had select to the plain water part.
  3. Continue Step 1 & 2 on the swimmer & words.
  4. Last part is clone the water part, press Alt and click on the water part. Then use the mouse click over the blur part (swimmer and words part).
  5. Done.

Ps: It might not works for the 1st time. Try a few times to make it works.

enjoy.

Face Look made by Computer Component

This is my very first Photoshop artwork.

Software : Adobe Photoshop CS4 & Adobe Illustrator Cs4

Theme: Free-style

Topic: Design Face with Computer Componets

Tools used:
(Adobe Illustrator CS4):
Clipping Mask & Layer
(Adobe Photoshop CS4)
Layer, Rotation, Eraser, Lasco Tools, Brush.

Color Adjusted:
Color Balance, Invert Color, Exposure, Brightness/Contrast

Image of I started till the end of my work.1. Is the first image i got, while doing this artwork. This Artwork i used combination of Illustrator and Photoshop.
2. This is the second image i edit. Totally used Photoshop feature. It is creepy look for me.
3. The third image i done out without the invert effect. I edited the color by Photoshop. Its more warm color now.

This is the basic way i do it.

After i done, this 3 image confused me. Some of my friend told me the first image is pretty cute.
The second one is artistic & it bring outs the feel of the topic.
The Third one is warm and gentle.
It was kinda confuse for me.

~~~~~~~~~~~~~~~

But in the end i choose the second image to pass up to lecturer.
Component that i used in the image is shown as image list:
1. Mouse
2. Cooling System Fan
3. Motherboard Chip
4. Circuit Board
5. Webcam
6. Wire

>.< Disfrute de los Creativos
by allyssa